Windows Firewall: Closing the Default Pinholes
In a previous post, we noted that Microsoft appears to be enabling inbound firewall rules for some of its apps such as xBox, Weather, even services for sharing your network connections with your contacts, and so forth. We call these openings in the inbound firewall for specific applications “pinholes.” In this post, first, we’ll look at how they do it. Then we’ll provide instructions on tightening the inbound firewall as much as possible.
- As mentioned we created a fresh Windows 10 installation and specified the network we were connected to was not to be trusted.
- Windows provides three types of realms for firewalls: domain (work), public(as in a public hotspot) and private (as in a home network).
- Normally a private network type is open. The default rule for incoming traffic is to allow it in.
- When you specify not trusted, Microsoft changes the default rule for incoming traffic on even a private network to not allow it in.
- It then adds rules for the apps we listed in the previous post such that any incoming traffic meant for those apps has a “pinhole,” that is, Microsoft allows it in just for those apps.
- There were more than a dozen such apps in the list.
- It is probable that though a typical user might use some of the apps, most would not use all.
- Anyone creating a Microsoft account (such as username@outlook.com, username@hotmail.com) will likely find data pouring into those pinholes from whatever Microsoft has stored for that user in its cloud. Whether this is welcome or not is beside the point.
- Because the user hasn’t asked for it, and in most cases probably doesn’t even know about it, we conclude this is an unrequested and unwelcome weakening of the default firewall.
- We have noted that in the future, as we see in the current mobile phone market, more and more devices are likely to receive publicly accessible IPv6 addresses. This will be downright dangerous given the relaxation of the Windows firewall for rules such as these.
What is to be Done?
Turning off the unwanted rules is easy. It just requires a little organizing. There is an application to show the rules (Windows Advanced Firewall). In it we can sort the columns to show the enabled rules. We can select multiple rules at once, and in an “Actions” pane at the side, we can disable the rules. We’ll disable all but “core networking.” Those particular rules are not necessarily safe, but Windows requires them for core networking tasks, which is why Microsoft calls them “core.” Other operating systems might disagree, but if we want to run Windows, there’s not much choice. Here’s how to disable all the other inbound pinholes:
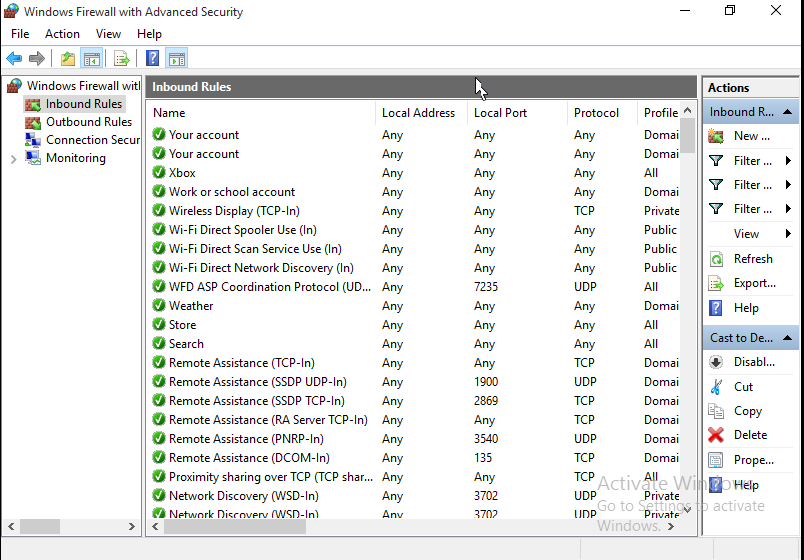
- Open the Start menu, and type in the first few letters of the word “firewall.” Look for Windows Firewall with Advanced Security and select it.
- Click on “Inbound Rules” in the tree pane at the left.
- In the middle pane, click on the “Enabled” column to sort the enabled vs. disabled rules. The enabled will be in the lower part of the list.
- Scroll to just the enableds. They should have a green indicator mark (a check in a circle). The enabled group should be in alphabetical order by rule name if this was the first column that you clicked on. You might also notice that all the rules “Allow” inbound traffic (though you may have to scroll the pane to the right a little). By disabling the rule, we “disallow” the “Allow.”
- Recall that we want to disable all but “core networking.” Click on the first enabled rule. Using the mouse wheel sroll down until you see the first of the “core networking” rules. Hold down the Shift key, and shift-click on the last rule before the “core networking” rules. This is called extending the selection, similar to the illustration below.
- In the right hand pane, lower part, once you’ve selected the several enabled rules, you should see an action for “Disable Rule.” Click it and disable the rules.
- You may have to wait a moment or two, and the middle pane may scroll a bit. When it’s ready, use your mouse wheel so scroll down so that you see the last of the “core networking” rules, and the next enabled rule that follows them. Click on that first enabled rule following the the “core networking” rules
- Scroll down with the mouse wheel till you see the last of the enabled rules. Hold down the Shift key, and shift-click on the last rule.
- In the right hand pane, lower part, you should see an action for “Disable Rule” again. Click it and disable the second selected group of rules.

You’ve now closed all the pinholes that Microsoft provided you without asking, even though you had told it not to trust your network.
There are a few further considerations, though. One consideration is that maybe you want some of the rules. For example, you may indeed wish to synchronize information from your xBox app with the cloud. Don’t worry, Microsoft will offer to change the firewall rule the very next time you run your xBox app. A dialog box will appear offering to open up the firewall for that application. This is actually the way that things should be: opt-in, based upon your first usage, rather than automatic-in, in anticipation that you may use the application.
We also need to be aware that Microsoft re-enables all the rules you disabled without asking sometimes. If you delete and add another network adapter, for example, the unwanted rules will reappear.
In the next post in this series we’ll discuss adding access for remote desktop services safely. While this may appear somewhat contradictory seeing as how we’ve gone to a bit of trouble to secure what we’ve secured so far, sometimes the reason for putting Windows on a public IP address is to make it accessible. For example, a Windows PC on a testing workbench, made accessible to software developers or quality assurance personnel located at remote offices. Or having your files on a home PC available to you at your office. The key is knowing the IP address of the remote location you wish to allow access to your PC. We’ll explain a few more circumstances in the next post, as well.
